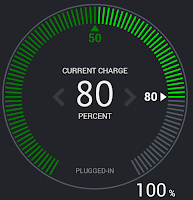
Electric Vehicle Home Charging - Charging to 80%
EV Home Charging - Charging to 80%
Maximum State of Charge
 |
Keeping the SOC of a lithium-ion battery above a certain point for long periods of time, particularly in the heat, has been shown to accelerate early degradation of the battery capacity. There are scholarly articles to dive into the details such as this one from BatteryUniversity.com.
I encountered the two-dimensional temperature - SOC plot on David Laur's David Laur's blog that focuses on life with a Nissan LEAF. The purpose is to communicate the best combination of temperature and SOC to maximize battery longevity in the LEAF's passively-cooled battery pack. In Dave's words: "Now, we all know Nissan put the fear of God into us when charging to 100% and letting it sit. They even went so far as to put in an 80% charge option for a few years."
 |
| Image source: David Laur's blog |
Maximum State of Charge and the Nissan LEAF
 |
| The Tesla App Maximum SOC Selector Image source: Karl Bloss |
Nissan removed the 80% maximum charge setting from their charge timer in later model years of the LEAF. While some LEAF owners interpret this as justification to charge to 100% daily, not all (myself included) trust this strategy. Therefore, many LEAF owners have come up with their own charging schemes. Here are a few.
Using the Onboard Charge Timer
The 2016 LEAF I drive has two onboard charge timers. This can be used to start and stop charging time even with a "dumb" EVSE (your external charging cord) to arrive at the desired maximum SOC. You will need to do a bit of math as well as some trial and error.
Here's an example: Let's say you have a 2015 LEAF with 85% battery state of health as determined by LEAF Spy or if you just lost your first battery capacity bar which happens approximately at that capacity. The original LEAF capacity is nominally 24 kWH (not that the usable capacity is actually slightly lower, but let's go with that), so 85% of that is 20.4 kWh. If your LEAF has the 6.6 KW onboard charger and your EVSE is capable of at least 6.6 KW, the car will charge from 0-100% in about 3 hours (20.4 kWh / 6.6 KW = 3.1 hours), keeping in mind that it slows down at the end. For charging at the low end of the SOC range, that translates to adding 10% in about 19 minutes.
So if you pull into your garage with 50% SOC and you want to charge to 80%, those 30% can be added in 3 x 19 minutes, so just under an hour. Set your charge timer for an hour and you should be about there. Again, it's worth testing this for your particular car and EVSE combination.
Of course, you need to do this math and set the timer differently every time you charge since the starting SOC will vary day to day depending on your usage.
Manual Timing
Obviously the above calculation and charge timing can also be done manually. Start your charging session by plugging in, calculate the charge time as above, then use a manual timer to remind yourself when to pull the plug.
The advantage of using the onboard timer is that you can set it and forget it. Also, you can delay your start time to take advantage of lower night-time power rates if those are available from your power provider.
The disadvantage is that charge timer programming can be tedious. Also, if you forget to turn the timer off, the car may not charge except for that same time period possibly leaving you with an insufficient charge.
Charge Timers
 |
| Charge Timer Box by Schultz Engineering Image source: https://www.schultzengineering.us/ |
LEAF driver Kraig Schultz of Schultz Engineering designed and built his own manual charge timer. Kraig writes: "It's well documented that babying a Lithium Ion battery by avoiding having it sit at high states of charge (greater than 80%) for long periods of time or at extremely high temperatures while at high state of charge is better for the battery. So I built a timer box with remote control activator to make it easy to charge to 80% when we first get home and then top it off to 100% just before leaving the house."
 |
| JuiceBox Pro40 Image Source: www.emotorwerks.com |
Smart EVSE: JuiceBox Pro 40
There are a number of web-connected and smart EVSEs on the market. The JuiceBox Pro 40 has been my home EVSE (aka charger) for nearly 2 years. As written up in my EV Home Charging Basics post, it is my personal favorite home charging solution. In addition to nearly 10 KW of home charging goodness, which is enough to charge both my Tesla Model S and Nissan LEAF at their maximum onboard charger rate, the Juice Box has a host of connectivity features that allow you to view and control charging from your smartphone.
Typically used features include remotely monitoring charging progress, turning charging on and off, and scheduling charging during off-peak power rates.
Configuring your JuiceBox includes setting your car type or types (it can handle multiples EVs) including the battery capacity and maximum charge rate. The battery capacity becomes important in the setup for the smart charging feature.
 |
| JuiceNet Charge Selection Screen Image source: Karl Bloss |
- When you arrive at home, make a mental note of your battery's SOC. In this example, it is 50%.
- Plug in your car. EV JuiceNet will not let you make changes unless it's actively charging. You might need to wait a moment or two until your app recognizes that the car is plugged in.
- Fire up your EV JuiceNet app and go to the charge selection screen.
- The charge screen defaults the starting SOC to be 0%. Tap and hold the dial near the starting slider triangle (should be on the circular bar near 0%) until the "Plugged-In With" window pops up. Drag it around the dial until it stops at the value of your actual starting SOC (50%).
- Tap and hold the dial for the desired final SOC the same way. I usually set mine to 80-85%.
- If you want to start charging right away, the slider bar at the bottom should be on "Charge Now".
- If you want to delay the starting time, the slider should be set to "Smart Charging" at which point the "Start charging" slider is activated and you can set the start time.
Monitor your first charging session to see where it stops. Since the charging time is calculated based on your battery capacity and the charge rate, EV JuiceNet may not hit the final SOC perfectly. Because it is based on your car's nominal capacity, the desired SOC will likely be overshot.
 |
| JuiceNet Vehicle Edit Screen Image source: Karl Bloss |
Calibrating EV JuiceNet
I found my first charging session to significantly overshoot the desired final SOC. The way to fix this is to play with the battery capacity setting. Since my LEAF was at 88% state of health of a nominal 30 kWh battery, I set the initial battery capacity to 26.4 kWh.
The battery capacity setting can be accessed via the top right menu in EV JuiceNet and then "My Vehicles". Use the "Edit" feature and then enter a new battery capacity. After a few iterations of charging, I determined that 24 kWh got me the final desired SOC most reliably.
I am not sure if 24 kWh is the actual degraded capacity, but this setting just works for me. You'll need to determine your own capacity setting to get the final value right for you.
Final Considerations
 |
| I asked for 80%, but landed at 83% Image source: Karl Bloss |
It's Not Perfect
Note that the final SOC will not always be spot on. Today, I set the final to 80% and the car charged to 83%. There are many factors, so just tweak the capacity setting for you and set the final SOC for your needs.
Starting Time
In addition to timing your charge to take advantage of lower power rates, you might also consider when to charge for battery heating effects. Battery charging is never 100% efficient and the losses always translate into heat.
In the winter and cold climates, you may want to set your charge timer so you battery gets some residual heating right before you're ready to head out so your car doesn't use precious battery power to heat the battery more than it needs to.
In the summer and hot climates, you may want to do the opposite. That is, charge when it's coolest and the battery has time to dissipate that heat prior to your trip departure.
Finally, if you do want to charge to 100% due to your travel needs, you can use your charge timer to minimize the amount of time your battery spends at high SOC. That is, try to time it so that it reaches 100% just before you are planning to leave rather than having the battery sit at 100% for most of the night.
Resources:
- EVSEs
- EV Home Charging Basics
- JuiceBox Pro 40
- Charge timer: Schultz Engineering
- EV Driving Experiences
- Follow me on Instagram: @muskegonevguy
- Listen to my Plug In West Michigan podcast on WKTV Community Media.
If you are in the market for a Tesla Model S, Model X, or Model 3, Tesla is soon phasing out its referral program. Until then, use my referral code to get free Supercharging for 6 months: http://ts.la/karl5062


Comments
Post a Comment
Feedback including suggestions or constructive criticism is welcome. Please note that abusive or offensive comments may be removed.